What Is Turbo Coder 64?
Turbo Coder 64, or TC64 for short, will generate Commodore 64 assembly language code in seconds with just the click of a few buttons.
The code is specifically written for TMPx by Style, which uses Turbo Assembler syntax. Because it’s Turbo Assembler based it will require very little tweaking to be compatible with other Turbo Assembler, Turbo Macro Pro, or other C64 cross assemblers.
What Can I Build With TC64?
A simple IRQ driven screen with scrollers, music, text? Absolutely! The premise is to save 20-30 mins when starting a new project so you can concentrate on the guts of your program.
We’ve also added some additional standalone editors and tools
- sprite or scroller bounce data
- plasma effect data
- text files for your scrollers
- even a cruncher to compact your files!
What Is Fuzzbouncer?
If you’re using sprites, or want to do a fancy bouncing scroller, this is how you get the data!
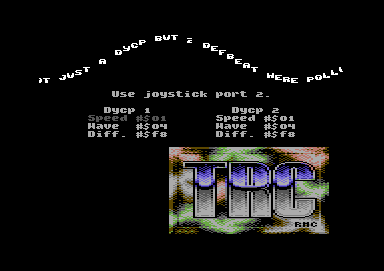
Here’s an example. Check out the scroller in the upper portion of this screenshot.

Notice how each character has a different Y position in a nice, wavy pattern. Fuzzbouncer generates the data for this type of effect!
Here’s a video on how to use the tool.
And What Is The Plasma Pattern Generator?
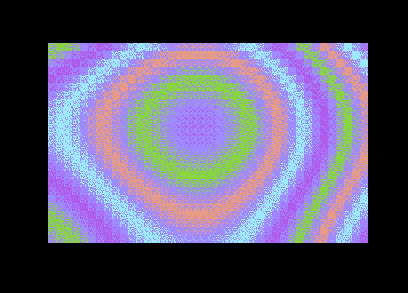
Perhaps you’ve seen effects like this in your favourite demo?

The Plasma Pattern Generator tool will help you create these patterns for your programs!
Easter egg: Set the # of colours to 9 and the effect in your browser will change from black and white to greyscale to help visualize. Don’t forget to change this back to the # of colours needed for your final project. Yes, we’re Canadian so for us it’s coloUr and grEy 😉
Here’s a walkthrough video of the Plasma Pattern Generator.
The “Texty” Text Editor?
If, like Fuzz, you’re too lazy to start up Vice, load the text editor, type your message, save it, extract it from the .d64, just use this!
Type your text, download the resultant binary, and include it into your TMPx project!
Crunchy?!
You’ll notice that when you link a bunch of files with TMPx, the file size can be quite large. Crunchy will shrink the size of your file by “crunching” it. No more searching your hard drive and asking “now where did I put the cruncher, and what was the command line again?!” Exomizer is the secret sauce on the back end, providing excellent compression results on a broad range of computers, and allows for level packing for use with a range of C64 IRQ loaders.
coloUr???!
Generate colour tables with ease! Click a colour or gradient button to generate colour data. Use these for screen transitions, raster bars, scroll text colours, whatever you please!
Fabulous! How Can I Contribute?
There are 2 easy ways! If you want to donate a few dollars to help continue the flow of caffeine or cover web hosting costs, feel free to donate using credit card or crypto.
If you want to donate some code / routines then feel free to drop us a line.
Where Do I Find And How Do I Use TMPx?
TMPx and docs can be found on Style’s web site.
Both text and video guides can be found below. Scroll on!
Help Me Quick Start!
Here’s what you can use to get started.
- Commodore 64 or emulator (example below will use Vice emulator)
- Notepad or similar text editor
- TMPx cross assembler
Got them, now what?
- Use the Code Builder to generate some TMPx code
- Once it’s generated, copy the code into Notepad or your favourite text editor
- Save the source code into the same folder as TMPx. Also ensure any other files you will link (music, graphics, etc) are in the same folder so TMPx can find them.
- Assemble with TMPx! The command is: TMPx -i yourfile.txt -o outputname.prg (specify the name of your code file after the -i and specify the name of the file to be built after -o)
Here’s a little batch file we use to do the assembly. It assumes WinVice 2.4 is up 1 folder and will automatically load our file into WinVice. You can copy this into Notepad and save it into the same folder as TMPx. Don’t forget to change the filenames to YOUR project names.
@echo off
cd %~dp0
TMPx -i source.txt -o assembled.prg
..\WinVice-2.4-x64\x64.exe assembled.prg
Here’s a video covering the above tidbits!
Example # 2 – Adding Music & Graphics!
In example two you’ll notice that specifying music and sprite file names will automatically add some code to initialize them. Mega time saver!
To build this project you will need some sample files. Grab them here.
And here’s the video walk through.
Note: This service may not work behind some proxy servers or tunnels.
Now that you have the flow, let’s check some of the more in depth settings.
Decrunch Effects
There are 2 batches of decrunch effects. These help show the user that the computer is “doing something” while your data decompresses. Some are for Commodore 64 only, and are marked with (C64 only) at the end. Screen blank uses memory location $d011 to close the borders and hide the entire screen. This allows the programmer to use screen memory starting at $0400 without displaying it. Once unpacking is complete, the screen visibility is restored. The rest of the options will work for all supported computer models, including the Commodore 64.
Turbo Coder 64 Syntax
split
The equivalent of “STA $D012”. Must be preceded with a hex value. EG.
#$32
split
init
Call the music player init routine. If you specified music initialization routine at $1000 it will add LDA #$00, LDX #$00, LDY #$00 JSR $1000 to the code. Change A, X, Y values as needed if your song has multiple tunes within. Check High Voltage Sid Collection if you need help finding these values. Only use this if you did NOT specify the filename in the builder and plan on manually doing it later. Specifying filename in builder will automatically call init in setup.
music
Call the music player routine. If you specified music play routine at $1003, it will add JSR $1003 to the code.
1×1
If you clicked the checkbox for the 1×1 scroller, you can enter 1×1 into one of the 3 split boxes to call the 1×1 scroll routine. Typically added right after a screen split. Also sets $D016 so the screen will scroll smoothly.
1×2
If you clicked the checkbox for the 1×2 scroller, you can enter 1×2 into one of the 3 split boxes to call the 1×2 scroll routine. Typically added right after a screen split. Also sets $D016 so the screen will scroll smoothly.
screen
Sets screen colour. Preceded by a hex value. Example:
#$00
screen
Ensure to include the # sign. Typing $01 followed by screen will set screen to the value contained in memory location $01, not to colour code 1 (white).
border
Sets screen border. Preceded by a hex value. Example:
#$0f
border
Ensure to include the # sign. Typing $01 followed by border will set border to the value contained in memory location $01, not to colour code 1 (white).
clr
Shortcut for LDA #$93 and JSR $FFD2 (clears the screen).
I Need More Tools!
We’ve got you covered!
- CartographPC – Make your levels and maps!
- UltrafontPC – Make your character sets!